

Building Your Own Weather Vane
Written by Jennifer K Mahal
Look outside. Is it sunny? Is it cloudy? Is it rainy? Is it cold? Did you know before you looked what the weather would be like? If you did, you probably relied on meteorology, the science of weather prediction.
The word “meteorology” actually means “the science of atmosphere and its phenomena,” according to Merriam-Webster. The earth has five layers of atmosphere: the troposphere, the stratosphere, the mesosphere, the ionosphere and the exosphere. Most of the things we think of as weather happen in the troposphere, which is the layer of gases closest to the surface of the earth.
It’s in the troposphere, which stretches about 8 miles from the ground, that we see clouds and feel wind. Ancient Babylonians used clouds and haloes around the sun to predict weather as far back as 650 B.C. The great Greek philosopher Aristotle had many theories about what caused rain, wind and lightning. He wrote them down in a four-volume treatise, Meteorologica, which people used to explain the weather for 2000 years, even though it had a lot of errors.
In the Renaissance, inventors created scientific instruments to measure weather like the hygrometer (1450s by Nicholas Cusa), which measures the amount of water vapor in the air; the thermometer (1592 by Galileo Galilei), which measures temperature; and the barometer (1643 by Evangelista Torricelli), which measures atmospheric pressure.
By charting changes using these things and others, scientists have been able to find data patterns that they can use to predict the weather. Predictions aren’t always 100% accurate, but they give us a better idea of whether or not we should wear a coat when we head outside.
It’s pretty easy to create a home weather station. To make one, you’ll need a thermometer, a barometer, a rain gauge, an anemometer (to measure wind speed), a weather vane and a journal to keep track of your data. Plans to create a thermometer, barometer, rain gauge and anemometer can be found in the Student Activities tab of the Weather Scope project in the Center for Innovation in Engineering and Science Education’s website: http://www.k12science.org/curriculum/weatherproj2/en/index.shtml
Weather vanes are one of the simplest weather instruments. Vanes tell which direction the wind is blowing. The first weather vane we known about is said to have honored the Greek god Triton, the messenger of the sea. It had the head of a man and the tail of a fish and the wand in Triton’s hand showed the direction the wind blew.
This homemade weather vane is a much less colorful design, though it would be fun to experiment with different styles. To make the weather vane, you will need:
* A Paper Plate
* A Small Round Plastic Container with a Lid
* A Straw
* Cardstock (a business card, postcard or old greeting card will work)
* An unsharpened Pencil with a New Eraser
* A Pin
* Play dough or Putty
* Rocks
* A Marker
* Scissors
* Ruler
* A Compass or a Phone with a Compass App
Take the small plastic container and put it in the middle of the back of the paper plate. If you can’t see the edges of the plate, the container is too big or the plate is too small. You want a container that will fit in the center with enough room on the edges to see letters. It also should be shorter than a pencil. A cottage cheese or small yogurt container should be the right size.
Take the ruler and draw a line across the center of the paper plate’s back. Draw another line perpendicular to it, going across at a 90-degree angle. Write N and S at the top and bottom of one of the lines. Write W at the end of the line the left of N, and E at the end of the line to the right.
Have an adult make a hole in the bottom of your plastic container, in the center. Poke the pencil through the hole, with the eraser side coming out of the bottom. Put putty or play dough on the center of the lid. Put a few rocks in the container, then push the lid closed, making sure the end of the pencil squishes into the play dough or putty.
Stand the container up, lid down. The pencil eraser should be sticking out of the end in a straight line and it should feel pretty stable. The rocks, the play dough and the container are all there to give the weather vane a heavy base so it doesn’t fall over in strong wind.
Cut a small triangle out of cardstock. Cut a larger rectangular piece for the back. The flag part (the rectangle) needs to be large enough to catch the wind. Experiment until you find the right size.
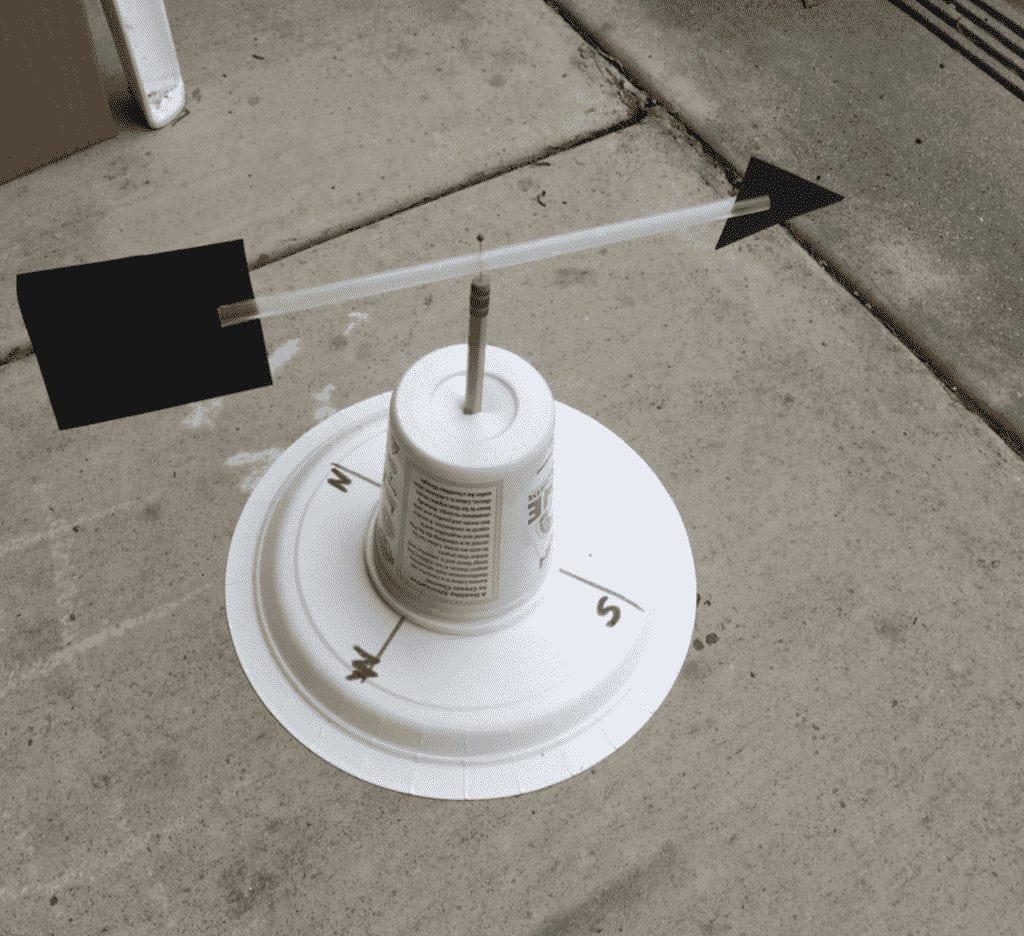
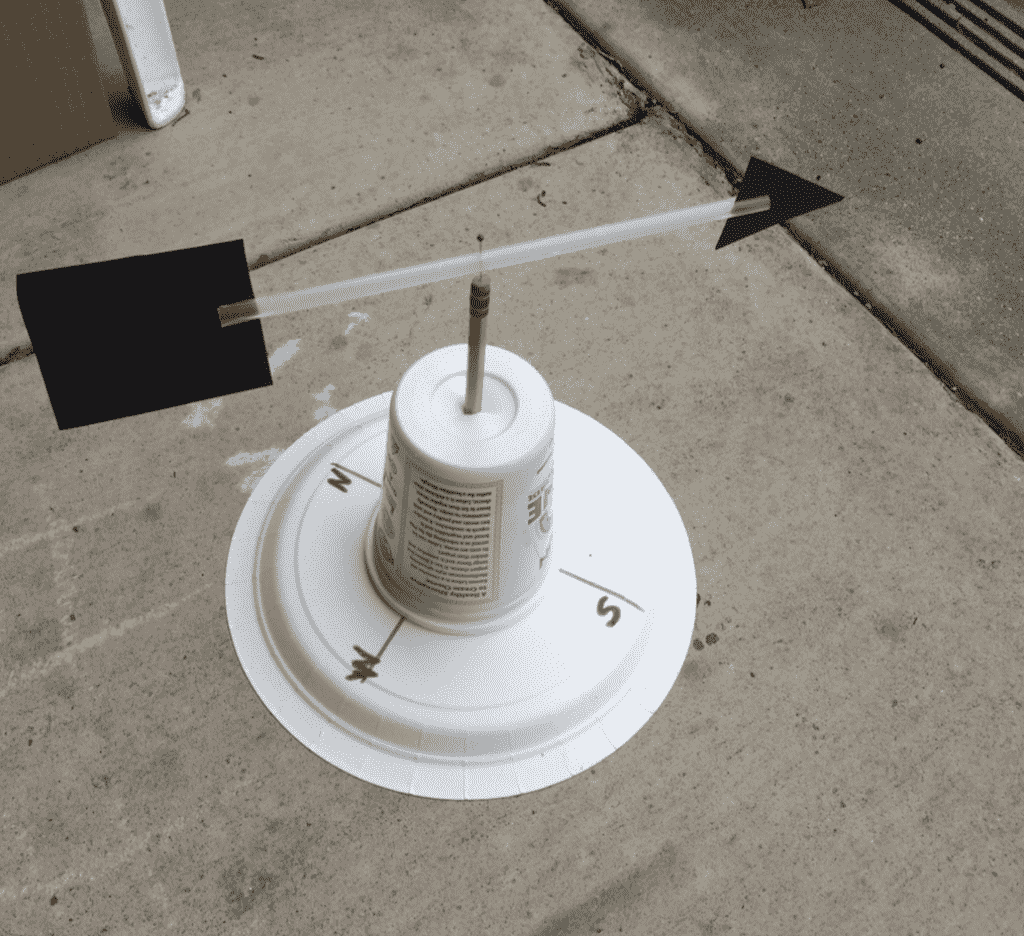
Use a ruler to measure the straw and place a small mark in the center with a marker. Cut a slit in both ends of a straw. Slide the triangle into one end and the rectangle into the other. Use the pin to carefully attach the arrow to the pencil eraser, pinning it through the center mark. Make sure to pin it loosely, so the straw can spin on the pin.
Go outside and using a compass or a compass phone app, figure out where North is. Place the paper plate so the side that says N is pointing in the right direction. Place your wind vane on top of the plate. See which way the wind blows!
Discover more science and art at the Santa Cruz Children’s Museum of Discovery in the Capitola Mall. Learn more at www.sccmod.org.
Jennifer K Mahal, who writes children’s books under the name Jenni Kaye, is a volunteer with the Santa Cruz Children’s Museum of Discovery. She lives in Santa Cruz with her husband and two children.