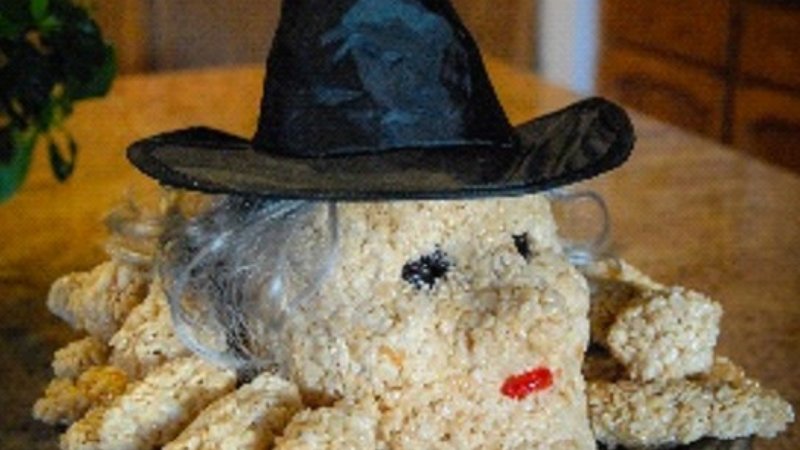


There’s something nostalgic— and delicious—about the aroma of homemade Rice Krispie Treats. The warm sweetness, the buttery crunch… It’s a childhood favorite that brings smiles to just about everyone. For over 40 years, I’ve turned this humble treat into a spooky and spectacular Halloween centerpiece: a life-sized witch’s head sculpted entirely from Rice Krispie Treats.
Kids love the gory (but edible) details: red- hot candy eyes, licorice hair, and gooey warts. Around the witch’s head, I arrange 50 knobby fingers—each with a red fruit leather “nail.” At my annual Halloween party, the guest who earns the most points during the games gets to take home the Krispie Witch. Word is, she makes the rounds at other parties before being devoured.
How To Make A Rice Krispie Witch’s Head
You’ll need:
- To make the full witch head and fingers, prepare 3–4 batches of Rice Krispie Treats using this basic recipe:
- 6 cups Rice Krispies cereal
- 40 large marshmallows
- 3 TBSP margarine
- Red Hots or rock candies (eyes, warts)
- Black licorice laces (hair)
- Red fruit leather (fingernails)
- 1 large can (e.g., pumpkin) to form the core
- Witch’s hat for decoration
Step-By-Step Instructions
Prep the base:
Cover an 18” round platter with plastic or festive wrapping paper. Place the large can of pumpkin (or similar item) in the center—this becomes the support for the witch’s head.
Melt & Mix (Batch 1):
In a large pot, melt 1 TBSP margarine and 13–14 marshmallows over medium heat. Stir until smooth. Add 2 cups Rice Krispies. Mix well and let cool slightly.
Sculpt the base head shape:
Wearing gloves, scoop about 1 cup of the mixture onto the can and start forming a round base for the head. Firmly press and smooth into a ball shape.
Add Facial Features (Batch 2):
Prepare another batch and use the sticky mix to sculpt a long nose, pointy chin, high cheekbones, and a furrowed brow. Press candy eyes into the sockets and mold Rice Krispies over the edges for eyelids and brows.
Details (Batch 3):
Form warts using Red Hots or small candies. Shape the mouth and lips by layering and molding. To make hair, insert toothpicks at the top of the head and press in black licorice laces. Cover the picks with a witch’s hat.
Witchy fingers (Optional Batch 4):
For a creepy display, roll out 5” x 1” logs for fingers. Taper one end, and press on a triangle of red fruit leather to resemble a fingernail. Arrange the fingers around the witch’s head on the platter.
Let it set:
Once your witch is fully sculpted, let her sit for at least 30 minutes to firm up.
Pro Tips
- Press the mixture firmly as you sculpt to help it hold its shape.
- Use gloves lightly coated with cooking spray to avoid sticking.
- Want a scarier effect? Dust her face with green sugar or use chocolate chips for moles.
Keep The Tradition Going
Every year, guests look forward to meeting my newest witch. Some years she’s ugly, some years she’s hideous—it all depends on how the Rice Krispies fall! I’ve expanded this tradition by making themed sculptures for every holiday: a Santa head for Christmas, an Easter egg, a turkey for Thanksgiving, a heart for Valentine’s Day, even a mini- park for Children’s Day. These edible creations become beloved traditions for both kids and adults.
So this Halloween, forget the store- bought centerpieces. Grab your cereal, marshmallows, and imagination—and sculpt up some spooky fun.
Send in photos of your own Rice Krispie Witch! We’d love to feature reader creations in next month’s issue!

Susan Tatsui-D’Arcy is the founder of Merit Academy (one-on-one classes and Merit Educational Consultants (college and educational advisory). She has written books on projects, free child care, education, and parenting. Susan hosts TEDxMeritAcademy for students to present their innovative projects and solutions. In 2019, she was California Mother of the Year.


2 Comments
Michele Roush
OMG! I just saw the subject line and immediately thought of you And was going to forward this article to youand lo and behold. It is you!
I’m going to make this for the grandkids’ Halloween party. Always a favorite.
Susan Tatsui-D'Arcy
That’s funny Michele! Send photos of your Rice Krispy witch! I’m sure your grandkids will love it! I usually keep mine as a centerpiece for weeks — and then we all dig in and eat it! They stay fresh for a long time!